Easy DIY “upholstered” corkboard!

Today I thought I’d share a quick little DIY I did for my kitchen the other day! I recently painted the entire kitchen/dining/hallway area and have been attempting to decorate it. I have an obscene amount of wall space in that area and I’m not quite sure what to do with it all! I will show a before and after of the kitchen soon, but first i have some touch ups to do!

mainimage_new

Continue reading

Clock Options?!?

I’m slowly working on our kitchen now, slowly slowly slowly. All the wallpaper has been removed and I’ve started the long annoying processes of patching the walls. And boy oh boy do they need patching. The walls were not treated everywhere before they put the paper up so in most places it came down very easy with the steamer, while in other locations, like under the cabinets and near where the paneling starts its a mess. There are layers of drywall peeled off and its going to be a lot of work!

I’ll get it done though, as much as I don’t want to.

A few weeks ago we had an electrician up to move some outlets/add some outlets/change out light fixtures. While he was here I had him take down the ugly clock that I despise that came with the house. When he was finally able to pull the wall off the clock (8 nails were holding that thing up!) it was discoved that all the electrical stuff he was going to remove was inside the wall and the trap door to get to it was so high up on the wall in the basement stairwell that he could not get to it. Needless to say, the clock is down but the working parts still remain…..

clockremoval


Originally I was going to borrow my parents little giant ladder in hopes that my husband could reach the trapdoor and pull the wires out, but then I started thinking….what if I put a new clock up there. I was going to try and make one, until I remembered I’m crafty but not artistic at all (my sister got that gene), but then I thought of wall decals!!

So these are some options I’m thinking off, although I’d order them in white because it’ll match the painted paneling and look nice with the green walls:

clockoption1


Bubble Clock Wall Decal – Style & Apply

clockoption2

Retro Sun Wall Decal Clock – Style & Apply

clockoption3


Number Wall Clock – Harry Clock

The last one is a bit on the funky side, but thats what I like about it. I should be able to fit the hands that they come with on the existing clock body in the wall, if  not I’ll make them fit…or make my own (I think I could handle that).

So which one do you like best? Have you see any other clock decals that would look lovely in that spot? Let me know!

“Master” Bedroom


before and after

No, I haven’t forgotten about my blog. I actually think about it quite often, and have things to post, but then I never post them. Instead I spend my time watching far to many youtube videos, reading, watching tv, and keeping our new cat from bugging our old grumpy cat! I know, I lead a very exciting life!

This post focuses on the “master” bedroom, I use master loosely because there isn’t a master bath or anything, its just the biggest bedroom out of the three!  Anyway, on to the makeover!!

Continue reading

Little Changes

Thought I would do an update showing a few things I’ve done around the house. Its still a work in progress, removing so much wallpaper really slows things down! At some point soon I really will show an update of the living room, it looks fabulous being brought up to date! I still would like a few more things on the walls, but I’m not sure what so I’m holding off for now.

First I thought I’d share the beautiful wood floor in the first bedroom. This room is currently a ‘catch all’ room. It has no real purpose and its never really used, except for the closet. My husband keeps his clothing in that one, because there is not quite enough room in our one bedroom closet for both of us. The rug was this ‘lovely’ patterned mess. It was so ugly! The one thing this room has going for it is that it is not wallpapered! It could use a fresh coat of paint, but its not a priority right now.

Before:

rug1After:

rug2I took the “after” picture from a different angle, so as you can see this room has a brown built in desk. Its handy for now, but one day I’m sure we’ll remove it and drywall that wall (its paneling). This rug was DEAD! I didn’t even have to cut it, I could just rip it with my hands. And the amount of dirt that came out of that thing was just disgusting! We only have 1 more rug to remove in this house, its the pink one in our bedroom, and I can’t wait till its gone!

Speaking of our bedroom, thats the room currently being worked on. Let me show you a ‘before’ picture. Its a pretty old picture, because its from before the ‘pool table’ light was removed, but it shows the wallpaper nicely.

bedroom1


Because of the ‘pool table lamp’ our bed had to be in a weird location for about a month or two, because it hung super low on the wall that was perfect for the bed. It has been removed and replaced, which you’ll get to see in this next photo. Ian was busy painting the ceiling and sent me this photo of  his progress. Look at how yellow that ceiling is!! GROSS!

bedroom2

The ceiling got its second coat today, so hopefully next weekend I can get some color on the walls. I managed to get them primed this weekend, I almost ran out of primer!

bedroom3As you can see I have yet to removed the paper from the closet doors and heater fronts (omg yes, those are papered). The closet doors I wan’t to take down so the paper can be properly removed, but I haven’t bothered to figure out how. I’ll be removing the fronts of the heaters to remove the paper on those as well, so its also not a huge rush. This week I’ll probably take some time to tape off the ceiling so I wont have to worry about it when I start painting!

So thats my little update, not a whole lot of excitement in the photos but I thought I’d share anyway! 🙂


Glitter Mugs & Ice!

Part of the reason I named this blog ‘developing projects’ is because I LOVE crafting. Its to the point that I’ll see something I love in a store and I’ll be all ‘omg, I could totally make that” and I wont buy it. Then I either end up never making it, or if I do I ending up spending way more money then if I just bought it, oh the life of a crafter! Pinterest is my favorite place to get ideas and awhile back I found the most amazing glitter mugs! The tutorial was by White House Black Shutters and its pretty good, so go check it out! I thought I’d share a few photos of my process, because why not! I picked up the mugs at the Dollar Tree, because thats the place to go for reasonably priced craft supplies!

Image

The finished product!

ImageI

I did have to get all the supplies at Michaels, which isn’t really near by unfortunately. Someone online mentioned you can get the Martha Stewart decoupage medium at Joann’s but I could not find it there. I ended up also picking up the fancy Martha Stewart glitter because its just so pretty!! I tried a few mugs with regular glitter but the particles were quite large and I didn’t like the look of it. The Martha Stewart glitter is extremely fine, and it gets EVERYWHERE. I’m still finding glitter everywhere. Its annoying but worth it!

Image

This is a selection of the mugs I made. These ones were not finished, I still had to do the two more coats of decoupage to seal the glitter in. I also ended up adding more glitter to the red & black ones, because as you can clearly see in the photo there were some lightly glittered sections that I just was not happy with.

I gave these out as gifts to all the ladies in my family (I was planning on making some for the men as well, which is why I bought black glitter, but my husband informed me no guy wants a mug covered in glitter, even if it is black. Whatever, dude!). I put a packet of hot chocolate in the mug and a candy cane (for stirring!) it seemed like everyone liked them! After 28 days these also become dishwasher safe, which makes them super easy to clean!

We also recently had a bit of an ice storm here in Maine, which you might have heard about on the news. Its no “Ice Storm of ’98” however some people have been out of power for 5 days now, which is just terrible. We only lost it for a few hours, but it makes me want a secondary heat source in the house even more. I’d love to have a pellet stove or a wood stove just so I don’t have to worry about freezing! I went out and attempted to take some photos christmas eve because everything was still covered in ice, I got a few good ones then my good camera died and I had to use my phone, boo!!

Here are the good pictures first!

Image

Image

Yup, two good photos then my camera died. So here are some kind of terrible Iphone photos!

Image

Image

Image

Image

Wedding Details: Clutches & Ring Box

I wanted to make my bridesmaids something special for being in my wedding, but I wasn’t sure what I could make. I knew jewelry was out of the question, I’ve tried that before and it doesn’t go well. My Mom sent me this blog post (she loves her blogs!) and I really wasn’t sure I could pull it off! First off, I thought they’d take forever, and second I hadn’t put in a zipper sense I made my graduation dress in high school, that was only 11 years ago! I gave it a go though, and they came out great, and all of my bridesmaids really seemed to like them!

clutch

I also made a little box for our rings that our ring bearer was suppose to bring down the aisle, it didn’t really work out but thats okay. Painting is really not something I’ve ever done, so really, a 5th grader probably could have done a better job, but oh well! I bought the box for $1 at Joanns and picked up some Martha Stewart paint that matched our colors to pretty it up with. The pillow that the rings are on I made out of leftover fabric I used for the bouquets, and some batting. I sewed some ribbons on the pillow to hold the rings down because I didn’t want to risk them falling out of the box!

box1

box2

And finally, here are a few photos that my fabulous photographer Mary Estes took of the bouquets and centerpieces!

(c) Mary Estes Photography 2013

(c) Mary Estes Photography 2013

(c) Mary Estes Photography 2013

PS. My Amazing Aunt made the boxes & “thank you” plaques, she did a great job!! And yes, those are mad libs (wed libs!) on the table that I made, perhaps I’ll go over those at some point as well!

Wedding Details: Centerpieces

As with the bouquets, I did not want to spend money on flowers for the table. I’m a tightwad at heart and I just didn’t want to spend the money on something that would die.  I used the same flowers as I did for the bouquet, however I put them on lollipops, so it was like an extra little favor! the lollipop was my sisters idea. Seeing as I hate bubblegum I did not want to use blow pops, so I went for the classic tootsie pop! I bought a few bags at CVS, then realized it would be cheaper to by a giant box on Amazon instead. Sadly those ones ended up having bar codes on the sticks, but I really don’t think anyone noticed.

I made 8 lollipops per vase, and 20 vases total. It was a process! I waited until September to start like the procrastinator that I am, so I had a schedule of 16 a night so I could get them all done as quickly as possible. For the most part I stuck to it, and they were all completed with time to spare! I purchased the vases at the Dollar Tree, along with the rocks in the base. Also, I have almost all the jar sooo if anyone is getting married…or just wants some vases let me know!

Now for some pictures of the process!!

centerpeice1

Just some of the many flowers I punched!

centerpiece2The creating process! Obviously just the beginning based on how few are in the container

centerpeice3

So Much glue!

centerpeice4

I had to wrap all lollipops with tissue paper and tie them with a ribbon in order to make them all uniform

centerpeice6 centerpeice5

The final product! This was actually the first one  I made, so the flowers are grouped by color, I fixed that in later vases. During this process I also discovered that Tootsie Pops now come in banana flavor, I’m sorry, but a banana lollipop just sounds gross!

I’m not sure what will be next, perhaps the clutches I made for the bridesmaids? We will see!

Wedding Details: Bouquets

So this past weekend I got married, and being the crafter that I am I decided to make a majority of the items needed for the wedding! I’ve decided share the various things I’ve made, one item at a time. This first post is going to focus on the bouquets. I couldn’t bring myself to spend money on flowers, they just die anyway! I made my sisters brooch bouquet for her wedding last year, but I didn’t want to go quite the same route. Originally I was leaning towards fabric flowers but they were not coming out how I wanted, but I kept trying! Then my Mom sent me this blog post and I knew exactly what I was going to do!

We will start with the bridesmaid bouquets, which I made four of. I used the smaller half balls of floral foam from Joanns, and for the handle I shoved a dowel in it and hot glued it. Looking back I probably should have wrapped the dowel in floral tape so it would have stayed in there better, but you live and learn! I used fillers of pearls and fake babies breath, and then covered the base with chocolate brown satin, also from Joanns, then wrapped up the handle in some pretty ribbon!

top view bdiesmadeunder bridesmaidcloseoup

My bouquet followed pretty much the same process, although I used the larger floral foam ball so it would be flashier. I also wanted some bling, because what bride doesn’t want a little bling!! We had some leftover brooches from my sisters bouquet, so I used those as well as a bracelet that I took apart, and I bought a package of sparkly buttons from etsy! My Mom also bought me a little “celebrate” charm from Lisa Leonard that I used on the handle.

bride2 bride1 bride3 bride4 bride5 bride6

Hope you enjoyed this, and I think the next post will focus on the centerpieces!

I’m alive!

I started this blog so I could document the updates we’re making to our house, and then I just abandoned it! We’ll I’m back, with photos of one of the spare bedrooms! its all complete!

In case you don’t remember, this is what it looked like before!

oldbedroom1

oldbedroom2This room actually had the least amount of of wall paper, because they chose not to wallpaper the heaters and baseboards! Yup, you read that right, all the other rooms have the baseboards and heaters papered to. Its fantastic…not. As you can see in the second photo the closet door is wallpapered and what you can’t see is that the back of the door to get into the room is also papered. It was a mess!!

Check out how beautiful it looks now though!

newbedroom1

newbedroom2

newbedroom3
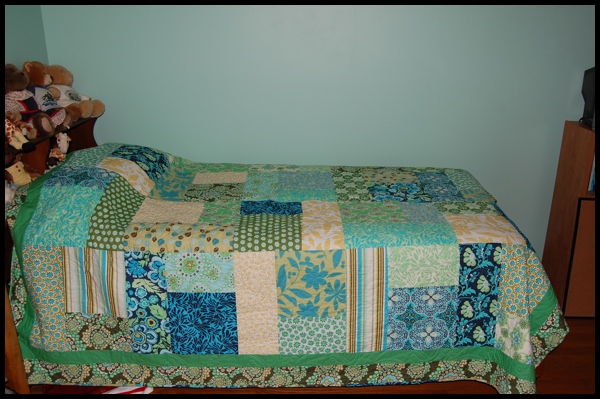
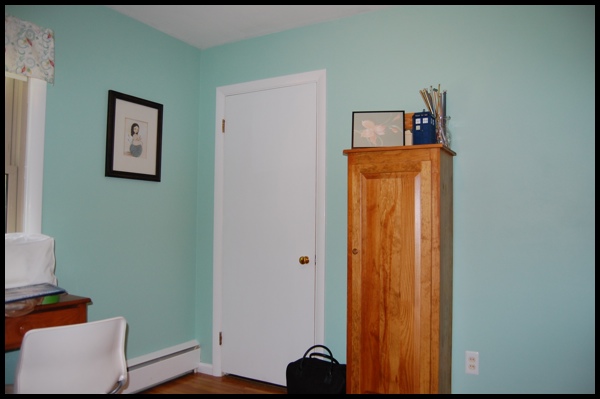
The wall color is Martha Stewart Paint in “Sea Glass”. I was actually given this paint and the color is beautiful. The funny thing that I had actually picked up a paint chip in this exact color before I even knew I was going to inherent a gallon of it! The bed is my childhood bed, and the quilt was a quilt my Mom made when I was little to go with it. She also made the quilt at the food of the bed! The bookshelf I bought unfinished a few years back and stained myself, along with the tall cabinate that actually holds my yarn stash. The desk my Dad picked up on the side of the road many years ago for a whole $5. The cube bookshelf is a Target special! Eventually I’d like to get bins that match the room, but its really not a priority.

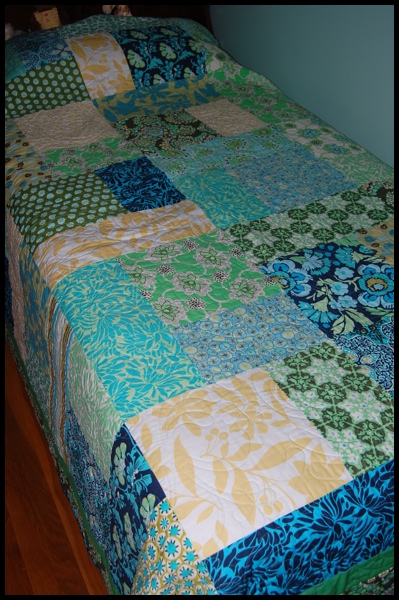
Sadly with the new freshly painted white everywhere the beige widows really stand out, but you can’t fix everything! The window topper I made myself with fabric I found at the local salvage store, you can really find some great stuff there! Yesterday I purchased 11.25 yards of Amy Butler fabric for $3.99 a yard, which is a super deal! Speaking of Amy Butler, since I took this pictures I actually inherited a new quilt from my Mom!

quilt1

quilt2The majority of the fabric is Amy Butler, and I love it! I’d actually been jokingly asking for it for months, and assumed she’d never give it up, but she did!! It looks fantastic in the room! Now I just need to get  a nice piece of art above the bed so its not so blank up there!

I think my favorite thing about the room is the oak floors, and the hideous rug was so easy to remove! I thought for sure I was going to have to figure out how to remove tack strips, but surprise  I did not! The rug was stapled in so it ripped up easy and then I just went through with some pliers and removed all the staples, which was easier then I expected as well! Once all staples were up I just gave it a quick wash and wax and it was good to go! No refinishing needed, thank goodness! Hopefully its that easy in the rest of the house!

And one last thing, my sister actually found a whole roll of that paper in the basement, and she wanted it for some crazy reason!! I was glad to give it up, because really I hate it. If you didn’t notice though, I did frame a small second of it and its still on top of my yarn cabinate just so that I never forget how ridiculously awful it looked before!